Detailed Installation Instructions
This chapter provides detailed instructions for installing Scyld ClusterWare. This software installation is intended for the first computer ("node") of the cluster, which functions as the "master node" to control and monitor other nodes and distribute jobs.
Scyld ClusterWare is installed on the master node that is running with a base distribution of RHEL5 or CentOS 5.
It is assumed that you are familiar with the concepts outlined in the previous chapters, and that you have correctly assembled the hardware for your cluster. If this is not the case, please refer to the previous chapters to acquaint yourself with Scyld ClusterWare, and then verify that your hardware configuration is set up properly.
Red Hat Installation Specifics
During a RHEL5 installation, you have the option to configure various aspects of the installation to support Scyld ClusterWare. Important points include the following:
Disk partitioning — Scyld recommends letting the installer automatically partition the disk; refer to the Red Hat documentation if you plan to manually partition instead.
Network interface configuration — To support your Scyld cluster, you need to configure one interface dedicated to the external public network (typically eth0) and one to your internal private cluster network (typically eth1). Detailed instructions are provided in the section on Network Interface Configuration later in this chapter.
Network security settings — You can configure some of your firewall settings during a RHEL5 installation. Other settings needed to support a Scyld cluster must be made post-installation. Detailed instructions are provided in the sections on Network Security Settings and Trusted Devices later in this chapter.
Package group selection — Scyld recommends installing all Red Hat packages. See the Section called Package Group Selection later in this chapter.
The following sections provide instructions and/or recommendations for specific portions of the RHEL5 installation that are relevant to an optimal Scyld ClusterWare installation. This guide does not cover all steps in the RHEL5 installation; you should refer to the Red Hat documentation for more complete information.
Network Interface Configuration
 | To begin, you must know which interface is connected to the public network and which is connected to the private network. Typically, the public interface is eth0 and the private interface is eth1. |
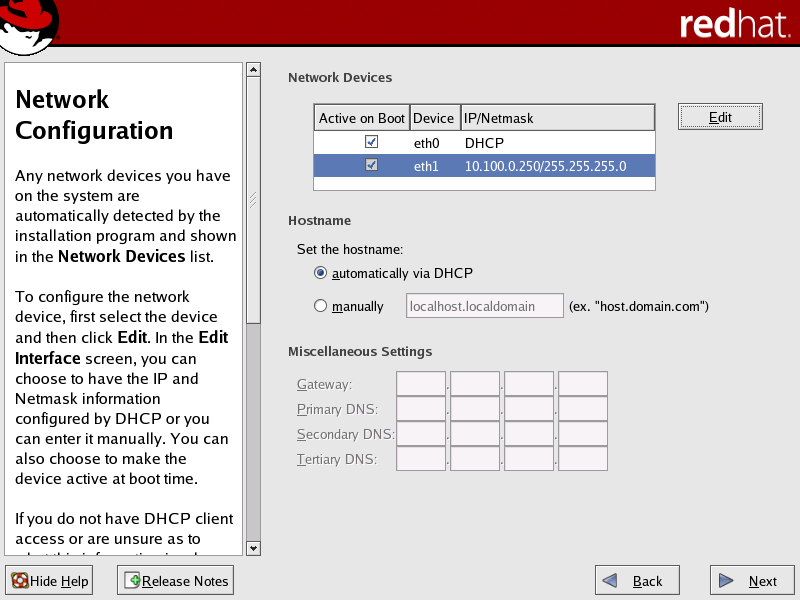
A typical Scyld cluster has one interface dedicated to the external public network (typically eth0) and one dedicated to your internal private cluster network (typically eth1). It is important to properly to configure both of these interfaces to support your Scyld ClusterWare installation.
The network interface configuration screen will be presented to you during a RHEL5 installation. For an existing Red Hat installation, you can access the network configuration screens through the Red Hat Applications -> System Settings -> Network menu options.
Cluster Public Network Interface
DHCP is selected by default for all network devices, as shown below in the Red Hat Network Configuration Screen. For the public network interface (typically eth0), this option is recommended.
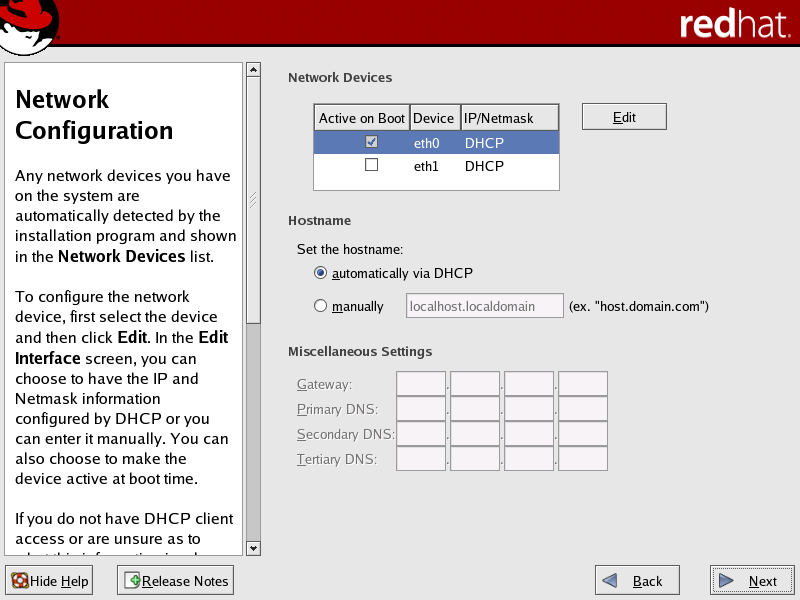
However, if your external network is set up to use static IP addresses, then follow these steps to manually configure the interface:
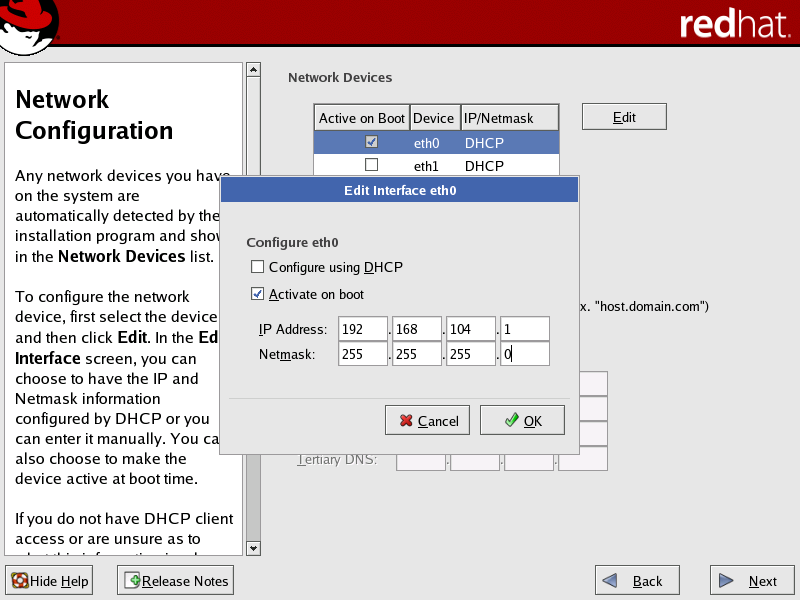
In the Network Configuration screen, select the public network interface (typically eth0) in the Network Devices list, then click Edit to open the Edit Interface dialog box.
In the Edit Interface dialog box:
Select the Activate on boot checkbox to initialize the specific network device at boot-time.
Specify the IP address and netmask provided by your network administrator.
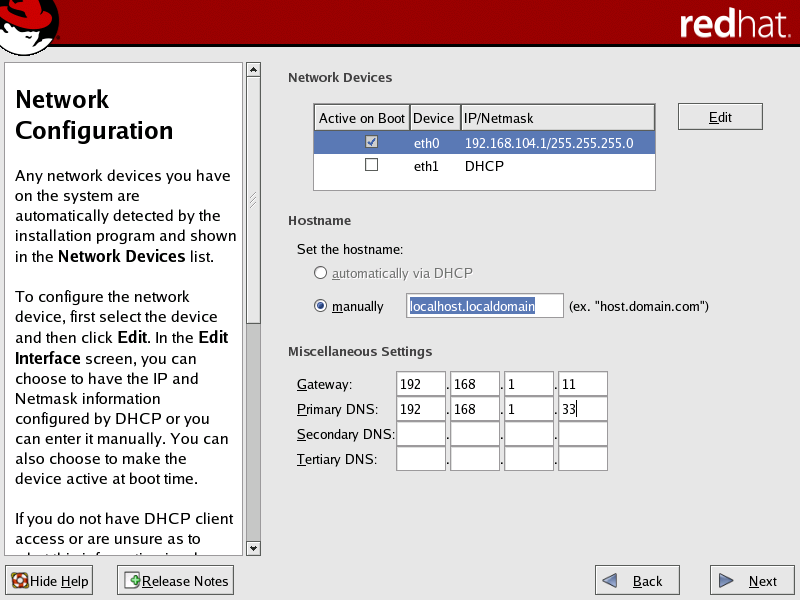
In the Set the hostname area of the Network Configuration screen, select the manually radio button and provide a host name.
In the Miscellaneous Settings area of the screen, enter the gateway and primary DNS IP addresses provided by your Network Administrator.
Cluster Private Network Interface
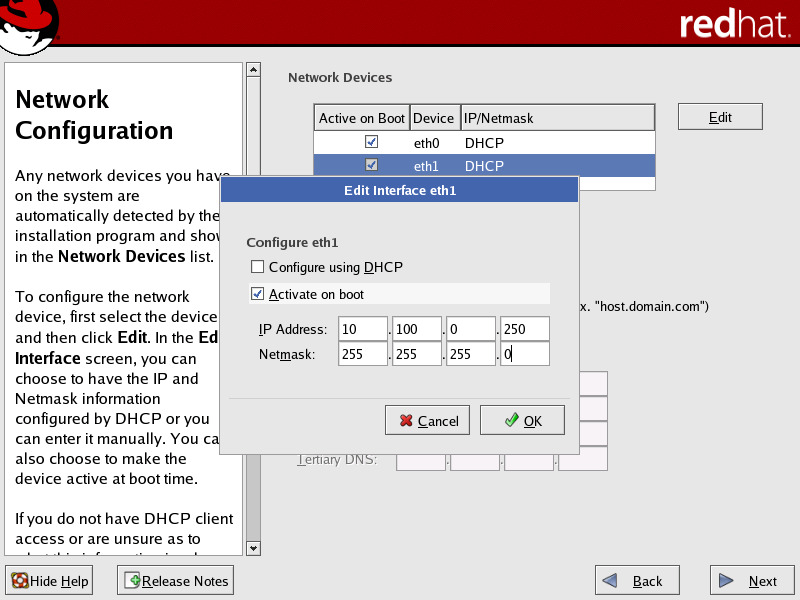
 | For the private network interface (typically eth1), DHCP is shown as default, but this option cannot be used. The configuration tool Beonetconf requires a static IP address for the private interface. Therefore, you must configure the network interface manually and assign a static IP address and netmask. The cluster will not run correctly unless the private network interface is trusted. You can set this interface as a "trusted device" when configuring the network security settings post-installation; see the Section called Trusted Devices. |
In the Network Configuration screen, select the private network interface (typically eth1) in the Network Devices list, then click Edit to open the Edit Interface dialog box.
In the Edit Interface dialog box:
Select the Activate on boot checkbox to initialize the specific network device at boot-time.
Specify a static IP address. We recommend using a non-routable address (such as 192.168.x.x, 172.16.x.x to 172.30.x.x, or 10.x.x.x).
If the public subnet is non-routable, then use a different non-routable range for the private subnet (e.g., if the public subnet is 192.168.x.x, then use 172.16.x.x to 172.30.x.x or 10.x.x.x for the private subnet).
Once you have specified the IP address, set the subnet mask based on this address. The subnet mask must accommodate a range large enough to contain all of your compute nodes.
In the Set the hostname area of the Network Configuration screen, you have the option to set the hostname automatically via the DHCP server or to provide one manually; this can be done according to your local standards.
The following figure illustrates a completed typical configuration for both the public and private network interfaces.
Network Security Settings
| The security features provided with this system do not guarantee a completely secure system. |
The Firewall Configuration screen presented during the RHEL5 installation applies to the public network interface and should be set according to your local standards. This screen allows you to customize several aspects of the firewall that protects your cluster from possible network security violations.
The RHEL5 installer allows you to select some, but not all, of the security settings needed to support Scyld ClusterWare. The remaining security settings must be made post-installation; see the Section called Trusted Devices.
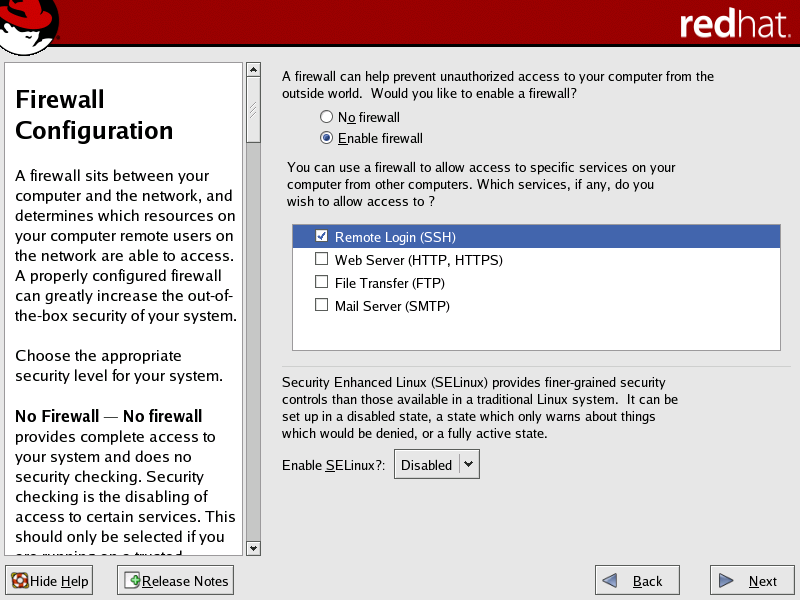
Scyld recommends setting a firewall for the public network interface (typically eth0). You can configure the following security settings during the Red Hat install:
Select from the following firewall options:
No Firewall — Allows all connections to your system and does no security checking. This option is not recommended unless you plan to configure your firewall after the installation.
Enable Firewall — Blocks any connections to your system that are not defaults or explicitly defined by you. By default, connections are allowed in response to outbound requests, such as DNS replies or DHCP requests.
Select services for which you want to allow possible connections. You can select any combination of the services listed.
If you plan to use SSH to connect to the master node, be sure that SSH is checked in the Trusted Services list.
Set the Enable SELinux? dropdown to "Disabled".
If you chose to install a firewall, you must make the private network interface (typically eth1) a "trusted device" to enable all traffic on this interface to pass through the firewall. See the Section called Trusted Devices.
Package Group Selection
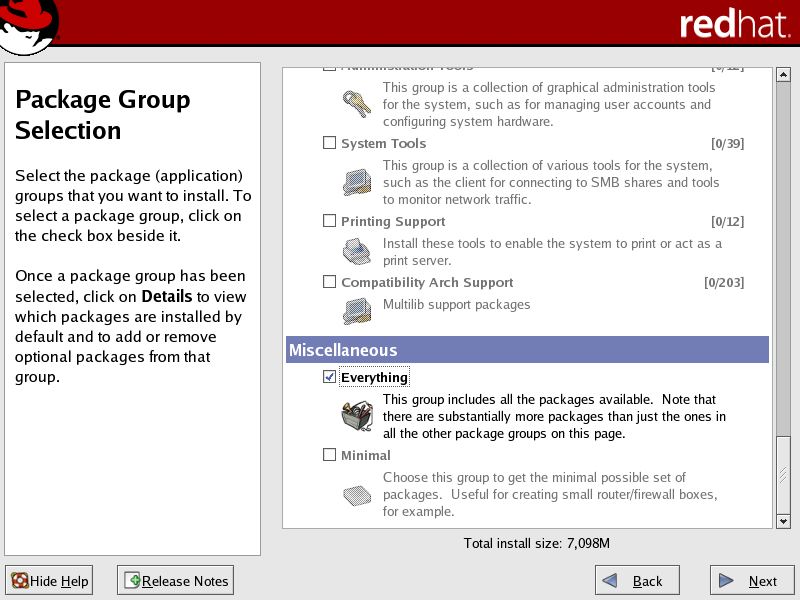
| Scyld ClusterWare depends on certain Red Hat packages, and the Scyld installation may fail if the necessary Red Hat packages are not installed. Therefore, Scyld recommends that you install all Red Hat packages. |
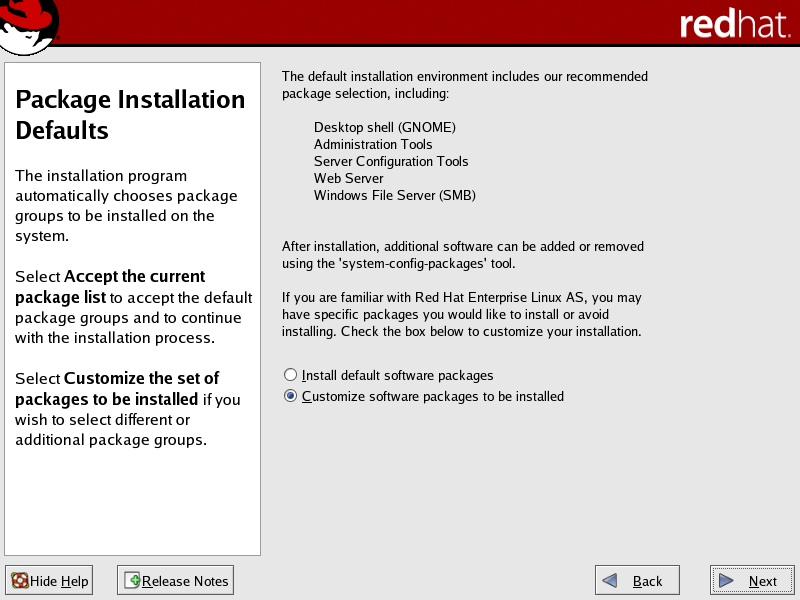
The Red Hat package selection screens enable you to select the particular software packages that you wish to install.
In the Package Installation Defaults screen, select the Customize... option.
In the Package Group Selection screen, scroll down to the Miscellaneous section. Select the Everything checkbox, then continue the installation process.
| To update an existing Red Hat installation to include all packages, insert the first Red Hat CD and invoke the Red Hat update program. Check the Everything box in the Package Group Selection screen, then continue with the update process. |