Network Interface Configuration
 | To begin, you must know which interface is connected to the public network and which is connected to the private network. Typically, the public interface is eth0 and the private interface is eth1. |
It is important to properly configure the network interfaces to support Scyld ClusterWare. The Network Configuration screen is presented during the RHEL5 installation; it can be accessed post-installation via the Applications -> System Settings -> Network menu options.
Cluster Public Network Interface
For the public network interface (typically eth0), the following settings are typical, but can vary depending on your local needs:
DHCP is the default, and is recommended for the public interface.
If your external network is set up to use static IP addresses, then you must configure the public network interface manually. Select and edit this interface, setting the IP address and netmask as provided by your Network Administrator.
If you use a static IP address, the subnet must be different from that chosen for the private interface. You must set the hostname manually and also provide gateway and primary DNS IP addresses.
| When configuring the network security settings (see the Section called Network Security Settings), Scyld recommends setting a firewall for the public interface. |
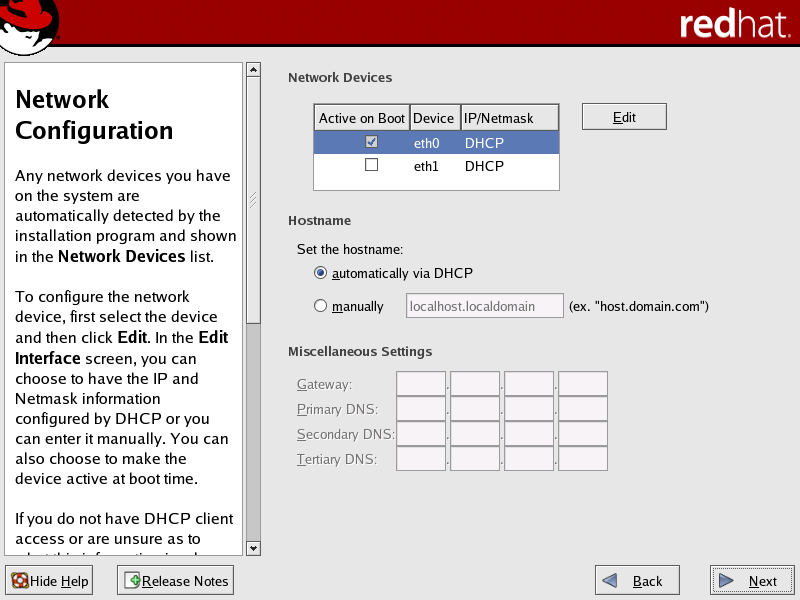
Cluster Private Network Interface
 | For the private network interface (typically eth1), DHCP is shown as default, but this option cannot be used. The configuration tool beonetconf requires a static IP address for the private interface. Therefore, you must configure the network interface manually and assign a static IP address and netmask. |
| The cluster will not run correctly unless the private network interface is trusted. You can set this interface as a "trusted device" when configuring the network security settings post-installation; see the Section called Trusted Devices. |
For the cluster private interface (typically eth1), the following settings are required for correct operation of Scyld ClusterWare:
Do not configure this interface using DHCP. You must select this interface in the Network Configuration screen and edit it manually in the Edit Interface dialog (see Figure 2).
Set this interface to "activate on boot" to initialize the specific network device at boot-time.
Specify a static IP address. We recommend using a non-routable address (such as 192.168.x.x, 172.16.x.x to 172.30.x.x, or 10.x.x.x).
If the public subnet is non-routable, then use a different non-routable range for the private subnet (e.g., if the public subnet is 192.168.x.x, then use 172.16.x.x to 172.30.x.x or 10.x.x.x for the private subnet).
Once you have specified the IP address, set the subnet mask based on this address. The subnet mask must accommodate a range large enough to contain all of your compute nodes.
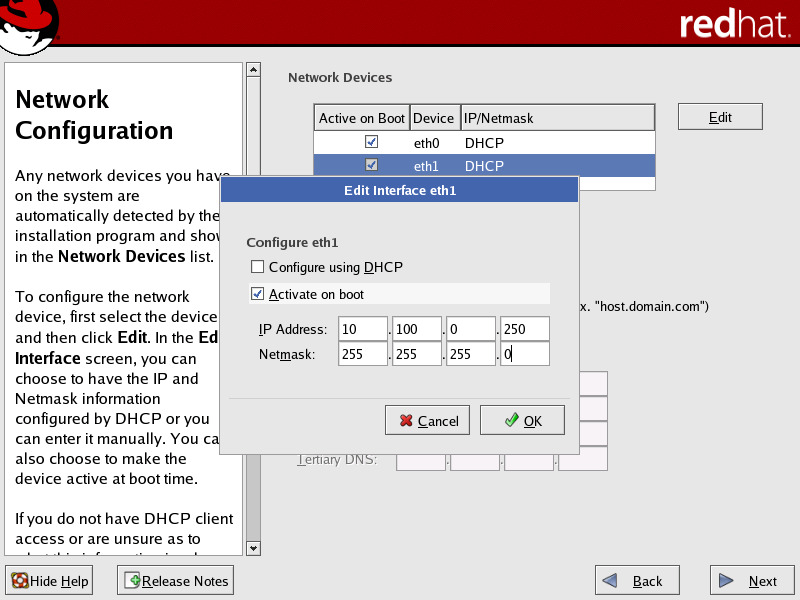
| You must first select the private interface in the Network Configuration screen, then click Edit to open the Edit Interface dialog box. |
| Although you can edit the private interface manually during the Red Hat installation, making this interface a "trusted device" must be done post-installation. |