The BeoSetup Tool
Scyld ClusterWare includes the BeoSetup cluster configuration tool, a graphical front-end for simplifying installation and control of the compute nodes in the cluster. Running BeoSetup isn't required for adding compute nodes; they will join the cluster by default. However, running BeoSetup as you initially power on the compute nodes gives you a graphical view of the nodes as they join the cluster.
BeoSetup is a thin layer over the underlying cluster functionality, not the cluster interface itself. Every operation that BeoSetup performs and every status that it reports is available from the command line, using scripts and with a library interface. Most of the configuration settings are written to the configuration file /etc/beowulf/config. Many of the actions, such as generating a boot floppy, report the command and options used to accomplish the task.
BeoSetup may be run by any user to monitor cluster node state, run commands, and read node logs; however, the full functionality is available only to the "root" user. When you start this tool as a user other than "root", you are asked for the root password. If you don't supply it, functionality is limited. For this reason, Scyld recommends running BeoSetup as "root".
This section provides descriptions of some of the basic BeoSetup functionality. For more detailed information on BeoSetup, see the Administrator's Guide.
Starting BeoSetup
If you chose GNOME (the default) for your desktop, you will see a graphical desktop when you log into Scyld.

To start the BeoSetup cluster configuration tool, click the BeoSetup icon on the Scyld graphical desktop or enter beosetup in a terminal window.
![]()
The BeoSetup main window is shown below and described in detail in the following sections. When this window first appears, it will contain no compute nodes.
An alternative to using BeoSetup is to enter the command bpstat -U in a terminal window on the master node to view a continuously updated table of node status information.
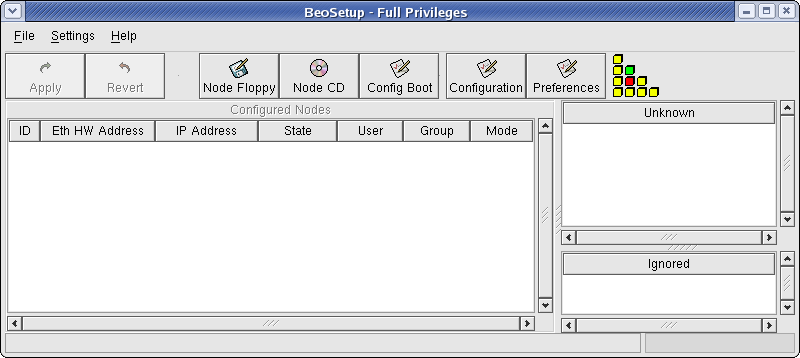
BeoSetup Node Panels
The BeoSetup main window contains 3 panes with Ethernet station or Media Access Control (MAC) addresses, uniquely identifying machines as follows:
Configured Nodes — This pane lists machines that have been assigned a node number, along with the relevant state.
Ignored Nodes — This pane lists machines that should never be added to this cluster, even though they have requested an IP address from the DHCP service or a PXE image.
Unknown — This pane lists machines that have requested an IP address or PXE image, but have not yet been assigned to either of the other two lists.
You can move nodes between lists by dragging an address with the left mouse button. Alternatively, right-click the address and choose the appropriate pop-up menu item. Configured nodes may be moved only when they are in the "Down" state.
 | Whether you are automatically adding new nodes to the cluster or manually configuring nodes to be added as described below, nodes do not appear in the "Unknown" or "Ignored" lists unless the maximum number of nodes are already connected to the master. |
BeoSetup Action Buttons
Above the Configured Nodes panel are two action buttons, specifically:
Apply — If you move nodes between lists, you must click the Apply button for the changes to take effect. Clicking this button saves the changes to the configuration file and signals the ClusterWare daemons to re-read the configuration file.
Revert — Clicking the Revert button causes Scyld to re-read the existing configuration file. This will undo any undesired changes that have not yet been applied. This can also be used to synchronize BeoSetup with any changes you have made to the configuration file with an external editor.
BeoSetup Short-Cuts
To the right of the Apply and Revert action buttons is a row of short-cut buttons, specifically:
Node Floppy — The Node Floppy short-cut allows you to write the boot image directly to a floppy disk for booting your compute nodes. Details are provided below.
Node CD — The Node CD short-cut allows you to write the boot image to your hard drive so that it can be burned to a CD-ROM. Details are provided below.
Config Boot — The Config Boot short-cut allows you to access the cluster boot options.
Configuration — The Configuration short-cut allows you to access the cluster configuration settings, including network properties, node boot options, node file system options, and PXE network boot settings.
Preferences — The Preferences short-cut allows you to choose which columns to display in the Configured Nodes panel and to change the node state colors.
All of the short-cut items are also accessible through the File and Settings menus.
BeoSetup Pop-Up Menus
Each listed node has an associated pop-up menu. Click the node to highlight it, then right-click to open the pop-up menu.
Only those functions in the pop-up menu that may be applied to the highlighted node are clearly visible. Some operations are invalid at certain times, and are "grayed out" (not selectable).