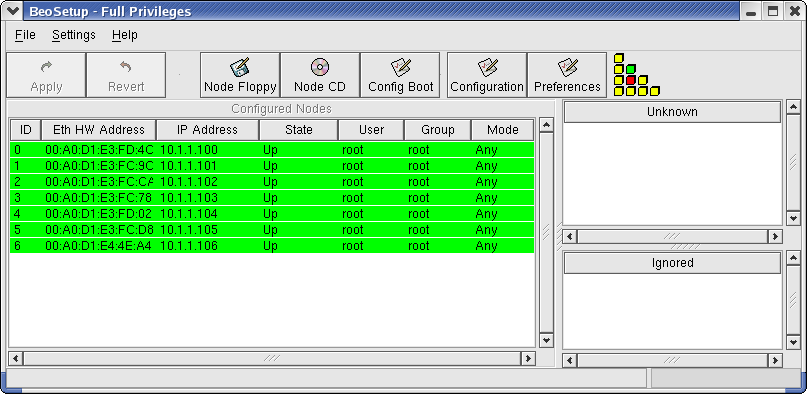
The Node List Boxes
The central area of the BeoSetup main window is occupied by three node list boxes:
The Configured Nodes list box
The Unknown addresses list box
The Ignored addresses list box
Each list corresponds to one of the three ways compute nodes in the cluster can be classified. The classification of a node determines how and where the node's data is stored in the cluster configuration files. Following is a brief description of each of the node classifications. Details for working with the nodes in each of the node list boxes are provided in the sections that follow.
- Configured Nodes
A "configured" node is one that is formally part of the cluster, and is recognized as such by the master node. All nodes classified as "configured" are listed in the Configured Nodes panel in the BeoSetup window.
"Configured" nodes are listed in the file /etc/beowulf/config. They are identified by the node tag, followed by the node's Ethernet hardware (MAC) address and the node's user/group permission data.
- Unknown Addresses
An "unknown" node is one not formally recognized by the cluster as being either "configured" or "ignored". When the master node receives a DHCP request from a compute node not already listed as "configured" or "ignored" in the cluster configuration file, and BeoSetup isn't configured to auto-insert or auto-append new nodes, it considers the request to be from an "unknown" node. The node is then listed in the Unknown addresses list box in the BeoSetup window.
"Unknown" nodes are listed in the file /var/beowulf/unknown_addresses. They are identified by Ethernet hardware (MAC) address.
- Ignored Addresses
An "ignored" node is one that you would like the master node to simply ignore for any reason. (For example, you may choose to temporarily classify a node as "ignored" while performing hardware maintenance activities that require the node to be rebooted frequently.) These nodes are not considered part of the cluster, and will not receive the appropriate responses from the master during their boot process. All nodes classified as "ignored" are listed in the Ignored node list box in the BeoSetup window.
"Ignored" nodes are listed in the file /etc/beowulf/config. They are identified by the ignore tag, followed by the node's Ethernet hardware (MAC) address.
Each node list box provides a pop-up menu, which may be opened by right-clicking with the mouse in the panel. In some cases, you must right click over an item in the list to get the menu to appear. The items presented in each menu are context sensitive. At a minimum, each menu provides options to reclassify a node by moving it from its current panel to any of the other two panels. In addition, nodes may be moved between windows using "drag 'n drop" mouse operations when running with full privileges. As is true for most changes made in the BeoSetup window, you must click the Apply button after performing these operations in order for the changes to take effect.
The Configured Nodes List
The Configured Nodes list box displays those nodes currently classified as "configured" and listed in the cluster config file with the node tag. This is the list you will typically be referring to most often when using BeoSetup, as these nodes are the ones that are formally treated as members of the cluster.
The columns of information that can be displayed for each node are described below. You can sort and reverse-sort the node list by the contents of any column, by simply clicking on the column heading. You can also specify which of the columns to display through the BeoSetup Preferences dialog box.
- ID
This column displays the node's assigned number in the cluster. The node numbers are assigned based on the node's position in the cluster config file (the first node is given #0, the second is given #1...). While the numbers may appear somewhat arbitrary, they become very important once you consider what it might take to perform maintenance activities on a particular node in a 128 node cluster. If BeoSetup shows an error on node #56, how do you find it? A description of why BeoSetup treats these numbers as important, is found in the section on numbering your cluster's nodes.
- Ethernet Hardware (MAC) Address
This column displays the node's Ethernet hardware (MAC) address. A node's address is stored with its associated entry in the cluster configuration file. As described below, a pop-up menu is available in this list box with an option to modify a node's Ethernet hardware address.
- IP Address
This column displays the node's IP address on the cluster's internal network interface. This number is computed from the node number and the starting address as defined by the cluster's IP address range. For a given row in the list (i.e for a given node number), the IP address will remain the same until the IP address range is modified. The IP address range can be changed using the Network Properties panel of the Configuration dialog box.
- State
This column displays the current state of the node as reported by BProc, the Beowulf unified process space software. The possible values for a node's state are as follows:
down — node is not communicating with the master
unavailable — node has been marked unavailable or off-line
error — node encountered an error during boot
up — node is operating normally and is on-line
boot — node has started, but not yet completed booting
Node states are also indicated by colored highlights. You can specify a color for each node state in the BeoSetup Preferences dialog box.
Keep in mind that these states only indicate the condition of the node as reported by the BProc daemons. In turn, the BProc daemons are only capable of determining a node's state based on the messages communicated (or not communicated, as the case may be) between a node and the master. For example, just because a node's state is not listed as error doesn't mean there isn't some undetected hardware problem occurring within the node. These states are only indicative of how the BProc software sees the node. A pop-up menu is available in this list box with options for taking nodes on and off-line.
- User
This column displays the user currently assigned as owner of the node. The value can be a user name, a numeric user id, or the Scyld-defined all encompassing user "any." The user permission setting for a node is analogous to the user ownership feature of files in Linux and basically controls who is allowed to use the node. As described below, a pop-up menu is available in this list box with an option for changing a node's user. A node's user data is stored with its associated entry in the cluster configuration file.
- Group
This column displays the group currently assigned as owner of the node. The value can be a group name, a numeric group id, or the Scyld-defined all encompassing group "any." The group permission setting for a node is analogous to the group ownership feature of files in Linux and basically controls who is allowed to use the node. As described below, a pop-up menu is available in this list box with an option for changing a node's group. A node's group data is stored with its associated entry in the cluster configuration file.
- Mode
This column displays the execute permissions, which are "user", "group" or "all".
Numbering Your Cluster Nodes
Depending on the size of your cluster, you may or may not pay a great deal of attention to how the individual nodes are numbered. After all, if your cluster is just a handful of commodity PCs sitting on some shelves, what's the big deal. Even a single rack of 8, 16, or 32 nodes may not seem like such a headache. But what about the lab with clusters containing 128 nodes or more? How would you figure out what box to examine if you only knew that node #37 was having problems? Luckily, BeoSetup was designed to make managing clusters of all sizes easy by paying careful attention to how nodes are numbered, and once setup, to maintaining those numbers.
When first setting up your cluster, it's recommended that you power up your compute nodes one-by-one in some logical order relative to how your hardware is arranged. In this way, for example, you'll know that the first box at the top of the rack is node #0, the second box from the top is node #1...and so on. Once you have all nodes in your cluster powered on and numbered (and presumably labeled), BeoSetup will maintain the node numbering of all the up nodes in your cluster as other nodes in the cluster are inserted and / or deletion. Examples will hopefully explain this better.
Let's say your cluster contains 3 compute nodes. Node #0 is currently powered off and down, while nodes #1 and #2 are up and running. If you delete node #0, its address is changed to off and it's left in the list as a placeholder so nodes #1 and #2 maintain their current node numbers. As nodes are inserted, moved around or deleted, BeoSetup takes care to ensure the assigned node numbers for all up nodes are maintained. Refer to specific operations described below for further details on what effect they have on a cluster's node numbers.
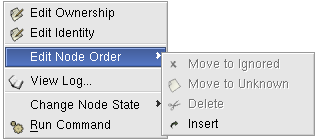
Configured Nodes Pop-up Menu
The Configured Nodes list box provides a pop-up menu for performing many operations related to the configuration and maintenance of "configured" nodes. When you right-click anywhere in this window, you are presented with the pop-up menu shown below.
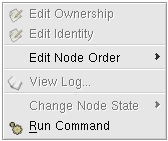
Depending on the node being selected, its current state, and your current privilege level, some of the items on the menu may be disabled. The following table details the availability of a menu item with respect to the selected node's current state.
Table 1. Configured Node List Pop-Up Menu Item Availability
| Menu Items | Down | Unavailable | Error | Up | Boot |
|---|---|---|---|---|---|
| Insert | ena | ena | ena | ena | ena |
| Edit | ena | dis | dis | dis | dis |
| Delete | ena | dis | dis | dis | dis |
| Move to Ignored | ena | dis | dis | dis | dis |
| Move to Unknown | ena | dis | dis | dis | dis |
| View Syslog | ena | ena | ena | ena | ena |
| View Beoboot Log | ena | ena | ena | ena | ena |
| Wake Up | ena | dis | dis | dis | dis |
| Reboot | dis | ena | ena | ena | ena |
| Halt | dis | ena | ena | ena | ena |
| Power Off | dis | ena | ena | ena | ena |
| Kill | dis | ena | ena | ena | ena |
| Mark Up | dis | ena | dis | dis | dis |
| Mark Unavailable | dis | dis | dis | ena | dis |
Note that the View Syslog... and View Beoboot Log... menu items are available to all users, regardless of their current privilege level. Of the remaining menu items shown in the table above, those listed as enabled are actually available only to users running BeoSetup with full privileges. These menu items will be disabled for those running with limited privileges.
Some of the functionality provided with the pop-up menu can be performed using drag-and-drop operations with your mouse. These operations are discussed where appropriate. You can also use drag-and-drop to reorder the numbering of the nodes in your cluster. Simply drag a node from one location to another to renumber the list. Note that you are only able to drag a node when its state is anything other than up, unavailable, error or boot. Also note that when dragging nodes around the list, the position of up nodes is automatically maintained by BeoSetup.
For any changes you make in this window to take effect, you must be sure to apply them.
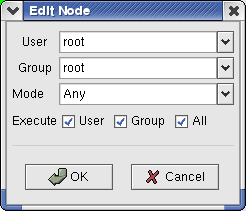
- Edit Ownership
This menu item opens the Edit Node dialog box, where you can edit the user, group, and mode of a node. You can also specify execute rights for the node.
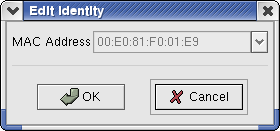
- Edit Identity
This menu item lets you modify the Ethernet hardware (MAC) address for the currently selected node in the Configured Nodes list box.
When initially displayed, the MAC Address field in the dialog box contains the selected node's current Ethernet hardware (MAC) address. Simply change the address to the desired value and select the OK button. If your changes contain any errors, an error message box will be displayed, and your changes will be ignored. Simply reselect the menu item and try again. Once your changes have been applied, the selected node's entry in the cluster config file is replaced with the new address. If you decide you no longer wish to change the node's hardware address, simply select the Cancel button.
Note that a node's MAC address is determined by the network interface card plugged in to the node. It should not be arbitrarily changed to another value unless you really know what you're doing. The capability to modify the address is primarily provided to change an off node to a real address and as a convenience when replacing network cards.
- Edit Node Order
This group of menus allows you to move, delete, and insert nodes in the Configured Nodes list box.
- Move to Ignored
This menu item moves the selected node from the Configured Nodes list box to the Ignored addresses list box. Once this change has been applied, the selected node is re-tagged in /etc/beowulf/config from node to ignore. As described in the section on numbering your cluster's nodes, when moving a node out of this list an off node may be automatically inserted by BeoSetup to maintain the current numbering of up nodes.
Another way to perform this operation is by dragging and dropping nodes using your mouse. Simply select and drag the highlighted node from the Configured Nodes list box and drop it onto the Ignored addresses list box. The drag-and-drop operation is functionally equivalent to selecting this menu item.
- Move to Unknown
This menu item moves the selected node from the Configured Nodes list box to the Unknown addresses list box. Once this change has been applied, the selected node is removed from /etc/beowulf/config and added to /var/beowulf/unknown_addresses. As described in the section on numbering your cluster's nodes, when moving a node out of this list an off node may be automatically inserted by BeoSetup to maintain the current numbering of up nodes.
Another way to perform this operation is by dragging and dropping nodes using your mouse. Simply select and drag the highlighted node from the Configured Nodes list box and drop it onto the Unknown addresses list box. The drag-and-drop operation is functionally equivalent to selecting this menu item.
- Delete
This menu item deletes the selected node from the Configured Nodes list box. Once this change has been applied, the selected node is removed from /etc/beowulf/config. As described in the section on numbering your cluster's nodes, when moving a node out of this list an off node may be automatically inserted by BeoSetup to maintain the current numbering of up nodes.
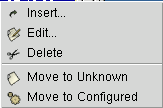
- Insert
This menu item allows you to insert a node into the Configured Nodes list box directly above the node you selected when clicking your right mouse button. (If you happened to right click in the white space at the bottom of the list box, the new node is simply added to the end of the list.) The new node is initially given an address of off, which can be changed using the Edit... menu item. Once changed and applied, the newly inserted node is written to /etc/beowulf/config using the node tag. As described in the section numbering your cluster's nodes, BeoSetup will automatically insert the new node where appropriate so as to maintain the current numbering of up nodes.
- View Syslog...
This menu item lets you view the master's /var/log/messages file, filtered for messages about the selected node. This menu item is available to users of all privilege levels, all the time.
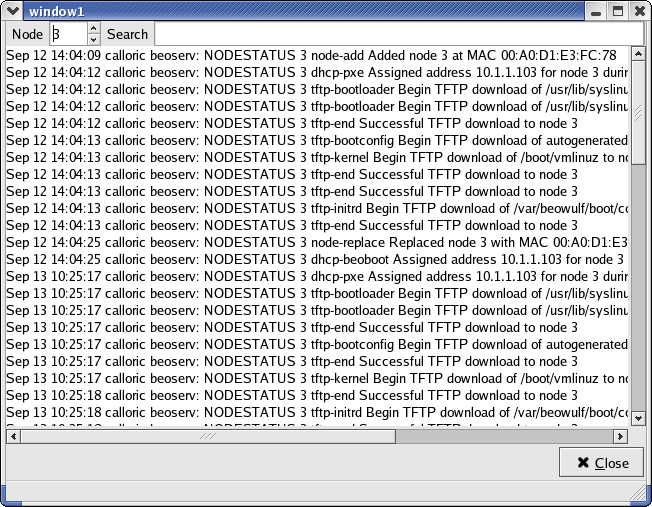
When you select this menu item, the window shown below is opened, displaying Beoserv messages from when the node was given its IP addresses and boot images, as well as all of the compute node's kernel log messages. If new information is added to the log file while this window is open, the window will automatically update with the new information.
You can display messages for another node in the cluster by entering the node number in the Node list box at the top of the window; you can also use the increment/decrement arrows to select a different node number.
You can search for specific information by entering a search string in the Search field.
To remove this window from the screen, select the Close button.
- View Beoboot Log...
This menu item lets you view the boot/status log for the selected node. This menu item is available to users of all privilege levels, all the time.
When you select this option, the window shown below is opened, displaying the contents of the node's activity log file. The name of the log file is shown in the window's title bar, /var/log/beowulf/node.# where "#" is replaced with the selected node's number. If new information should be added to the log file while this window is displayed, the window will automatically update with the new information.
To remove this window from the screen, select the Close button.
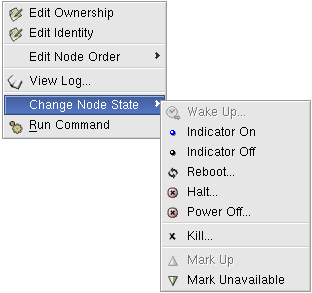
- Change Node State
This group of menus will allow you to change the state of "configured" nodes.
- Wake Up...
This menu item can be used to send a Wake On LAN message to the selected node. Wake-On-LAN is the generic name for the AMD "Magic Packet" technology. It's very similar to the PCMCIA modem "wake on ring" signal line. The basic idea is that the network adapter has a very-low-power mode to monitor the network for special packet data that will wake up the machine. When this menu item is selected, the script /usr/lib/beoboot/bin/node_wake is executed, which uses the ether-wake utility to generate and send the special data packet to the node.
- Indicator on, Indicator off, Reboot..., Halt..., Power Off..., Kill...
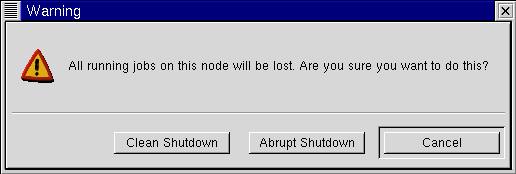
These last four menu items all perform somewhat related functions. In each case, the master node sends commands to the selected compute node using the script /usr/lib/beoboot/bin/node_down. The selected operation is passed to the script as a parameter. Reboot will cycle power to the node off and then on again. Halt will suspend the node. Power Off will shut off a node completely. Finally, Kill will totally disavow the node by changing its state to down.
After selecting any one of these items, the following alert will be displayed:
You have 3 options:
Selecting the Cancel button closes the message box, and the node will be left .
If you select Abrupt Shutdown, the new state is directly passed on to the BProc distributed process space software, and the node responds accordingly.
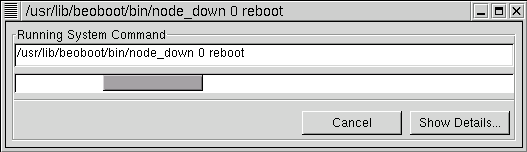
If you select Clean Shutdown, the selected operation is performed by running the node_down script. The following progress dialog box will be displayed during the operation:
Although this dialog box contains a Cancel button, it is not recommended that you select it during a clean shutdown, as it is very likely to leave the selected node in an ambiguous state. When the operation completes, the Cancel button is renamed to Close, which can then be selected to close the dialog box. At any time, you can click the Show Details... button to enlarge the dialog and view the output from the execution of the node_down script.
- Mark Up, Mark Unavailable
These two menu items allow you to change the selected node's state. When the node's state is up, you can mark it as unavailable; when the node's state is unavailable, you can mark it as up. The up and unavailable states are analogous to the familiar computer terms on-line and off-line.
You may want to temporarily mark a node as unavailable to take if off-line for performing some routine maintenance. While the node is off-line, it will not be automatically used by the scheduler for running any jobs. Once you've completed your maintenance activities, simply mark the node as up and it's back on-line again.

The Unknown Addresses List
The Unknown addresses list box displays the Ethernet hardware (MAC) addresses for the nodes currently listed in the unknown addresses file, /var/beowulf/unknown_addresses.
Unknown Addresses Pop-up Menu
To reclassify an "unknown" node, you may drag the node from the Unknown addresses list box and drop it over one of the other two node list boxes.
You may perform the same operation using a pop-up menu. If you right-click over any of the nodes listed in this box, the pop-up menu shown below will be displayed.
If you are running BeoSetup with limited privileges, all the items in the pop-up menu will be disabled. To use the pop-up menu or the drag-and-drop features, you must be running BeoSetup with full privileges.
When you make changes in the BeoSetup window, you must click the Apply button in order for them to take effect.
- Delete
This menu item deletes the selected node from the Unknown addresses list box. Once this change has been applied, the selected node is removed from the unknown addresses file /var/beowulf/unknown_addresses.
- Move to Configured
This menu item moves the selected node from the Unknown addresses list box to the Configured Nodes list box. Once this change has been applied, the selected node is removed from the unknown addresses file /var/beowulf/unknown_addresses and added to the cluster config file /etc/beowulf/config with the ignore tag.
You may perform this menu operation on multiple, contiguous nodes in the list by first selecting the nodes before opening the pop-up menu.
Another way to perform this operation is by dragging and dropping nodes using your mouse. Simply select and drag the highlighted node from the Unknown addresses list box and drop it into the Configured Nodes list box. The drag-and-drop operation is functionally equivalent to selecting the menu item.
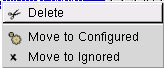
- Move to Ignored
This menu item moves the selected node from the Unknown addresses list box to the Ignored addresses list box. Once this change has been applied, the selected node is removed from the unknown addresses file /var/beowulf/unknown_addresses and added to the cluster config file /etc/beowulf/config with the ignore tag.
You may perform this menu operation on multiple, contiguous nodes in the list by first selecting the nodes before opening the pop-up menu.
Another way to perform this operation is by dragging and dropping nodes using your mouse. Simply select and drag the highlighted node from the Unknown addresses list box and drop it into the Ignored addresses list box. The drag-and-drop operation is functionally equivalent to selecting the menu item.
The Ignored Addresses List
The Ignored addresses list box displays the Ethernet hardware (MAC) addresses for the nodes currently listed with the ignore tag in the cluster config file /etc/beowulf/config.
Ignored Addresses Pop-up Menu
To reclassify an "ignored" node, you may drag the node from the Ignored addresses list box and drop it over one of the other two node list boxes.
You may perform the same operation using a pop-up menu. If you right-click over any of the nodes listed in this box, the pop-up menu shown below will be displayed.
If you are running BeoSetup with limited privileges, all the items in the pop-up menu will be disabled. To use the pop-up menu or the drag-and-drop features, you must be running BeoSetup with full privileges.
When you make changes in the BeoSetup window, you must click the Apply button in order for them to take effect.
- Insert...
This menu item adds another node to the bottom of the Ignored addresses list box. The node is initially given an address of off. Once changed and applied, the newly inserted node is written to the cluster config file /etc/beowulf/config with the ignore tag. Any "ignored" nodes in the list box with an address of off are not written to the cluster config file when changes are applied.
- Delete
This menu item deletes the selected node from the Ignored addresses list box. Once this change has been applied, the selected node is removed from the cluster config file /etc/beowulf/config.
- Move to Unknown
This menu item moves the selected node from the Ignored addresses list box to the Unknown addresses list box. Once this change has been applied, the selected node is removed from the cluster config file /etc/beowulf/config and added to the unknown addresses file /var/beowulf/unknown_addresses.
You may perform this menu operation on multiple, contiguous nodes in the list by first selecting the nodes before opening the pop-up menu.
Another way to perform this operation is by dragging and dropping nodes using your mouse. Simply select and drag the highlighted node from the Unknown addresses list box and drop it into the Ignored addresses list box. The drag-and-drop operation is functionally equivalent to selecting the menu item.
- Move to Configured
This menu item moves the selected node from the Ignored addresses list box to the Configured Nodes list box. Once this change has been applied, the selected node is re-tagged from ignore to node in the cluster config file /etc/beowulf/config.
You may perform this menu operation on multiple, contiguous nodes in the list by first selecting the nodes before opening the pop-up menu.
Another way to perform this operation is by dragging and dropping nodes using your mouse. Simply select and drag the highlighted node from the Unknown addresses list box and drop it into the Configured Nodes list box. The drag-and-drop operation is functionally equivalent to selecting the menu item.