The Toolbar
The toolbar is the collection of buttons running across the BeoSetup window, directly below the main menu and directly above the node list boxes. This toolbar contains the Apply and Revert action buttons for making/undoing changes to the cluster configuration. The toolbar also includes shortcuts for creating boot media and for accessing compute node boot options, cluster configuration settings, and BeoSetup display preferences. The toolbar buttons are described in the sections that follow.
Apply
The Apply button on the toolbar is used to activate changes made in any of the three node list boxes (Configured Nodes, Unknown, and Ignored). Selecting this button writes the latest node information to the appropriate configuration files, and then commands the appropriate daemons to reread these files.
For a description of what information gets written to the configuration files when you apply changes, see The Node List Boxes later in this chapter.
The Apply button will be disabled or enabled as follows:
When you run BeoSetup with limited privileges, this button will always be disabled, as users with limited privileges are unable to make any changes to the nodes.
With full privileges, the button is initially disabled. It becomes enabled after you make a change in one of the node list boxes. For example, when you drag a node from the Unknown list box to the Configured Nodes list box, the Apply button gets enabled. This new node isn't recognized as part of the cluster until you select the Apply button to activate the change.
Whenever this button is enabled, it usually indicates that the information displayed in the node list boxes is not synchronized with the data in the configuration files.
Revert
The Revert button on the toolbar is used to undo changes made in any of the three node list boxes (Configured Nodes, Unknown, and Ignored). Selecting this button deletes the contents of all three node list boxes, thus undoing all the changes you've made since you last selected the Apply button. The three lists are then repopulated by rereading the current configuration files. The idea is that this button lets you revert back to the original contents of the configuration files before you started making any changes with BeoSetup.
For a description of what information is read from the configuration files when initializing the contents of the node list boxes, see The Node List Boxes later in this chapter.
The Revert button is initially disabled; it becomes enabled or disabled again as follows:
With full privileges, the button becomes enabled after you make a change in one of the node list boxes.
The button also becomes enabled whenever BeoSetup notes a change in the modification time of the configuration file /etc/beowulf/config. The enabling of the Revert button under this circumstance occurs regardless of the current privilege level. This feature is meant to alert all users to changes to the config file that may have occurred without their knowledge.
Whenever this button is enabled, it usually indicates that the information displayed in the node list boxes is not synchronized with the data in the configuration files.
Node Floppy
The Node Floppy button in the toolbar opens a dialog box where you can create a "PXE-on-a-disk" image for booting a compute node in your cluster. This "etherboot" image allows the node to PXE boot even though its NIC may not support PXE.
 | Boot floppies are supported only for i386 (32-bit) clusters, and cannot be used for x86_64 clusters. |
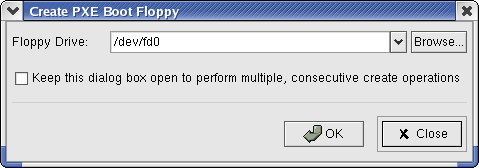
- Floppy Drive
Use the Floppy Drive field to specify the device name for the floppy drive you'll be using; you can browse to the device if needed. The default is /dev/fd0, which specifies the first floppy drive in a standard desktop computer.
- Keep this dialog box open...
If you plan to create multiple boot floppies (one for each compute node), select the Keep this dialog box open... checkbox so that you don't need to reopen the dialog box multiple times.
After the floppy media has been inserted into the drive, click the OK button to begin creating your boot floppy. If you decide you no longer want to create a boot floppy, click the Close button to close the dialog box. Once creation of the boot floppy has started, you'll be presented with the following dialog box providing you with visual feedback as the operation progresses.
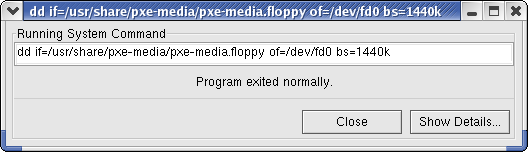
If at any time you want to stop the creation of a boot floppy, simply click the Cancel button in the progress dialog. When the operation completes, the Cancel button is renamed to Close, which can be clicked to close the dialog box. At any time, you can click the Show Details... button to expand the dialog and view the output from the operation.
Node CD
The Node CD button on the toolbar opens a dialog box where you can create an etherboot image (ISO-9660 image) on your hard drive. You can then burn this image to a CD or DVD, typically using the cdrecord command, to use for booting a compute node.
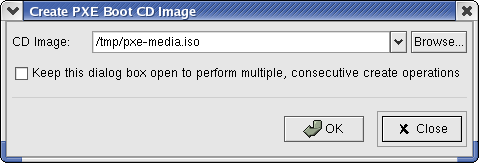
- CD Image
Use the CD Image field to specify the ISO image; you can browse to the ISO if needed. The default is /tmp/pxe-media.iso.
- Keep this dialog box open...
If you plan to create multiple boot CD images (for instance, with different values for the kernel commandline parameters), select the Keep this dialog box open... checkbox so that you don't need to reopen the dialog box multiple times.
When you are ready to write the ISO image to the hard drive, click the OK button. If you decide you no longer want to write the ISO, click the Close button to close the dialog box. Once creation of the boot CD has started, you'll be presented with the following dialog box providing you with visual feedback as the operation progresses.
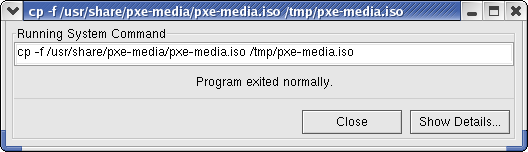
If at any time you want to stop the creation of a boot CD, simply click the Cancel button in the progress dialog. When the operation completes, the Cancel button is renamed to Close, which can be clicked to close the dialog box. At any time, you can click the Show Details... button to expand the dialog and view the output from the operation.
Config Boot
The Config Boot button on the toolbar opens a dialog box where you can create a network boot image, which is downloaded from the master node to each compute node during the boot process. This beoboot file contains the final kernel image and modules that the compute node will use.
The boot image is updated whenever Beowulf services are restarted (via service beowulf restart or by selecting File > Start Cluster in the BeoSetup window). It is also a good idea to do this whenever you upgrade the kernel or any modules on the front end. Running the same kernel on the master node and the compute nodes is highly recommended.
 | If you have nodes selected in the Configured Nodes list box when you click this button, the resulting boot values will apply only to the selected nodes, and will not be the default values applied to the rest of the nodes. To clear node selections in the Configured Nodes list box, click the mouse in the panel and hit the [ESC] key on your keyboard. |
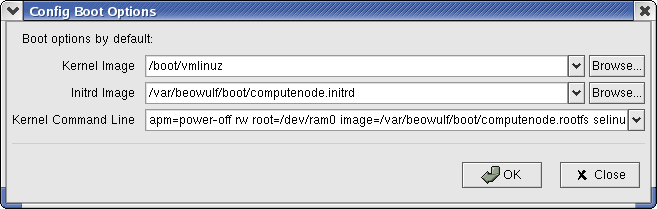
- Kernel Image
This field specifies the kernel image file (normally /boot/vmlinuz) that will be sent to the compute node by the master during the boot process.
- Initrd Image
This field specifies where to get the initial RAM disk image, which is sent with the kernel to the compute node at PXE boot time. Normally, this image is /var/beowulf/boot/computenode.initrd. This item does not run the beoboot command to generate the intird or rootfs images, but assumes these were run automatically when Beowulf services started or were run manually from a terminal window.
- Kernel Command Line
This field specifies any boot flags you'd like passed to the kernel when it's booted. Note that the "image" parameter of the kernel command line specifies where the compute node will get its root file system image; the root file system image is created by the beoboot command. The history of items entered in this field is presented in the dropdown.
Specifying Alternate Boot Options
The default values shown in the Config Boot Options dialog box will serve the master's kernel and associated initrd and rootfs to the compute nodes at PXE boot time. To change these for a selected set of compute nodes, do the following:
Run beoboot to generate alternate initrd and rootfs images to different locations.
In the BeoSetup window, select the nodes that should use these alternate images in the Configured Nodes list box. Then click the Config Boot button to open the Config Boot Options dialog box.
Modify the values in the Kernel Image and Initrd Image fields. Also edit the "image" parameter in the Kernel Command Line field.
Click the OK button in the Config Boot Options dialog box. Then click the Apply button in the Beosetup window to apply the changes.
Configuration
The Configuration button on the toolbar is a shortcut to the Configuration option in the Settings menu. Clicking this button opens the Cluster configuration dialog box.
Preferences
The Preferences button on the toolbar is a shortcut to the Preferences... option in the Settings menu. Clicking this button opens the BeoSetup Preferences dialog box.