The Settings Menu
The Settings menu contains the following selections:
Configuration
Preferences...
Reread Cfg Files
Note that the settings accessed through the Configuration menu option affect the boot process and operation of the cluster; these settings are written to the cluster configuration file /etc/beowulf/config. The settings accessed through the Preferences... menu option affect only the appearance and actions of the BeoSetup GUI; these settings are saved per user, typically in ~/.gnome/beosetup.
Configuration
The Configuration item in the Settings menu opens a multi-paneled dialog box that allows you to modify many of the cluster configuration options. The values you set in this dialog are all written to the cluster configuration file /etc/beowulf/config.
The dialog box contains four panels, Network properties, Nodes, Node File Systems, and PXE Network Boot. The settings available in each of these panels are described in the sections that follow.
At the bottom of the dialog box are four buttons. The OK and Apply buttons perform somewhat similar operations. When selected, both buttons validate the changes made to the dialog and then act on those changes. The difference between the two buttons is that the dialog box is closed when using the OK button, but remains open when you select Apply, allowing you to make additional changes.
If any of your changes are invalid (see particulars below where the widgets are discussed) and you click OK or Apply, you'll be presented with a message box describing the error. Upon closing the error message box, one of two things will happen depending on which button you first selected. If you selected the OK button, after closing the error message box the Configuration dialog box closes immediately. If you selected the Apply button, after closing the error message box the Configuration dialog box remains open, giving you the opportunity to correct the errors and try again.
Selecting the Close button results in the loss of any changes you've made since you last selected the Apply button, and closes the dialog box.
Selecting the Help button displays this page in the help browser.
If you're running BeoSetup with limited privileges and you select this menu item, the Configuration dialog box will still be displayed but all the widgets on each panel will be grayed out and disabled. With limited privileges, you can view the current settings, but you won't be able to modify any settings. To make any changes, you must be running with full privileges.
A toolbar button is available as a shortcut for this menu item. When selecting the toolbar button or choosing the menu item, you are presented with the Cluster configuration dialog box, initially displaying the Network properties panel. To switch among the panels in the dialog box, simply select the tab for the desired panel.
Cluster Configuration: Network Properties
The Network properties panel of the Cluster configuration dialog box lets you specify properties for the cluster network interfaces. Note that eth0 is the cluster public (external) network interface and eth1 is the cluster private (internal) network interface.
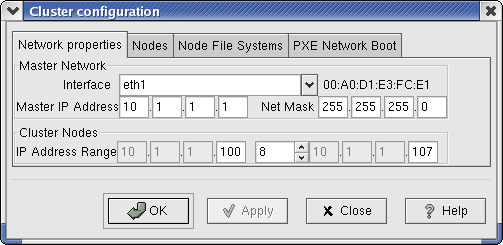
- Interface
This widget is where you select the internal cluster network interface used by the Beowulf server daemon. It defines the communication path between the master node and all the compute nodes in the cluster. This option is stored in the config file as "interface".
- Master IP Address
This widget displays the IP address of the master node on the internal cluster network interface. This is the address used by the compute nodes when communicating back to the master node. This address must be in the same subnet, but may not fall in the IP address range used for the compute nodes (see below). This setting, along with the net mask, is typically configured by the underlying Linux system based on the contents of the /etc/sysconfig/network-scripts/ifcfg-eth0 file.
- Net Mask
This widget displays the network address mask configuration of the internal cluster network interface. This setting is read from the current interface state.
- IP Address Range
This widget is where you specify the range of IP addresses assigned to the compute nodes on the internal cluster network interface. The maximum number of compute nodes in the cluster is defined by this inclusive range (the range includes the upper address). This option is stored in the config file as "iprange" and the computed value "nodes". BeoSetup assists in setting a valid range by using the net mask value to limit which elements of the addresses may be modified.
Cluster Configuration: Nodes
The Nodes panel of the Cluster configuration dialog box lets you specify the node assignment policy for new nodes as they are added to the cluster. New nodes may be assigned by the always-running service daemon Beoserv, or through the BeoSetup GUI ("manually" from the point of view of the daemons, even if it's the GUI automatically moving the addresses between columns).
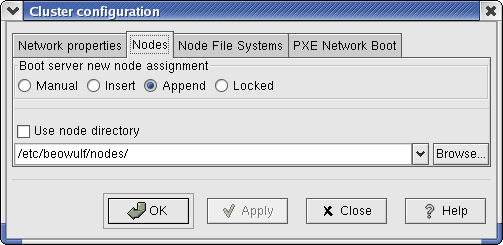
- Boot server new node assignment
These radio buttons let you change the node assignment policy used for assigning node numbers and IP addresses to new nodes as they join the cluster. There are four options:
Off — The operator can manually configure all new node addresses.
Insert — New nodes will be assigned to the first available node number. Nodes are numbered sequentially starting from 0.
Append — New node IP addresses will be appended to the end of the Configured Nodes list box. This option is effectively the same as Insert if the final node number has been assigned.
Locked — This locks in the current node order and IP addresses. Both Beoserv and BeoSetup will be prevented from adding or changing node IP addresses or node order.
- Use node directory
When this box is checked, node information will also be stored in the specified directory, with one file written per node. The directory /etc/beowulf/nodes/ is the default.
Cluster Configuration: Node File Systems
The Node File Systems panel of the Cluster configuration dialog box lets you configure how the file systems are treated during boot. When a compute node is booting, the server will attempt to configure the node's file systems by running some combination of a file system check and a file system create.
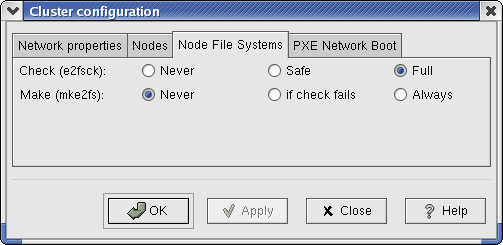
- Check (e2fsck)
These radio buttons let you specify the type of file system check performed during boot. This option is stored in the config file as fsck; there are three possible values:
Never — No file system check will be performed.
Safe — The file system check gives up if any "bad" errors are encountered.
Full — The system will try to answer "yes" to all the "Should I fix?" questions that may occur during the file system check.
- Make (mke2fs)
These radio buttons let you specify the type of file system create performed during boot. This option is stored in the config file as mkfs; there are three possible values:
Never — No file system create will be performed.
If check fails — A blank file system is recreated if the file system check fails.
Always — The file system is recreated during every boot. If you select this option, the Check (e2fsck) options will be disabled, and the file system check will be skipped.
Cluster Configuration: PXE Network Boot
The PXE Network Boot panel of the Cluster configuration dialog box lets you specify options for booting the cluster over the network.
"PXE" stands for Preboot eXecution Environment, which is a set of protocols and specifications for standardized network boot. Most machines with built-in Ethernet interfaces now include a PXE boot client in firmware. Scyld ClusterWare includes our own BeoPXE Server, which makes compute node booting substantially more reliable than other implementations and is directly configured from the standard cluster configuration.

- Alternate PXE interface
This checkbox should be selected when the compute nodes must boot from a different network than they use for run-time operation. Input the network interface name, or choose the down arrow for other network selections. The BeoPXE Server will use the specified network interface for PXE booting rather than the cluster network interface. This alternate network interface should be connected to the booting interface for the compute nodes.
Following are three examples of configurations that require an alternate PXE interface:
When compute nodes have a Fast Ethernet network interface that supports PXE booting and a Gigabit Ethernet interface without PXE support. The Gigabit Ethernet is the desired operational network.
When compute nodes have an Ethernet network interface that supports PXE booting and a specialized cluster NIC (Myrinet, Infiniband, etc.).
When compute nodes are RLX compute blades and the only network interface that supports PXE booting is connected to an internal repeater. Using an Ethernet repeater is very slow during normal operation, so the cluster interfaces should be connected to an Ethernet switch, while the master should use a separate network interface connected to the internal RLX repeater. The second interface and the internal repeater are used only for booting.
- Limit bandwidth
When this box is checked, BeoSetup limits network use of booting machines to avoid timeouts. You can input a value or use the increment/decrement arrows to select the desired PXE service bandwidth limit in Mbps.
Preferences
The Preferences... item in the Settings menu displays a multi-paneled dialog box allowing you to modify the appearance and actions of the BeoSetup GUI. These settings are saved per user, typically in ~/.gnome/beosetup.
The dialog box contains three panels, Display, State Colors, and Notes. The settings available in each of these panels are described in the sections that follow.
At the bottom of the dialog box are four buttons. The OK and Apply buttons perform somewhat similar operations. When selected, both buttons validate the changes made to the dialog and then act on those changes. The difference between the two buttons is that the dialog box is closed when using the OK button, but remains open when you select Apply, allowing you to make additional changes.
Selecting the Close button results in the loss of any changes you've made since you last selected the Apply button, and closes the dialog box.
Selecting the Help button displays this page in the help browser.
BeoSetup Preferences: Display
The Display panel of the Preferences... dialog box lets you specify which columns are displayed in the Configured Nodes list box.
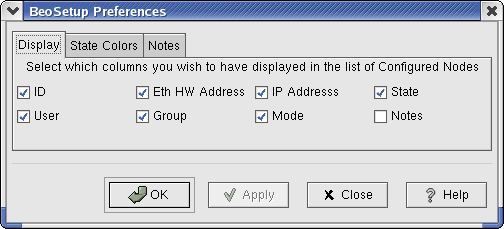
- Columns displayed in the Configured Nodes list
There are 8 columns that can be displayed by checking the corresponding box:
ID — The Node ID number (required) will be displayed.
Eth HW Address — The node's unique hardware address (MAC address) will be displayed.
IP Address — The IP address assigned to the node will be displayed.
State — the current node status ( such as Down, Up, Rebooting, etc.) will be displayed.
User — The username of the user who controls the node will be displayed.
Group — The groupname of the user group that controls the node will be displayed.
Mode — The execute permissions (user, group, or all) will be displayed.
Notes — The administrative notes will be displayed.
BeoSetup Preferences: State Colors
The State Colors panel of the Preferences... dialog box lets you specify the highlight colors to represent the various node states for machines listed in the Configured Nodes list box.

- Node states
You can select a highlight color for each of 9 node states:
Down — Display color for nodes that are down.
Unavailable — Display color for nodes that are administratively unavailable.
Halt — Display color for nodes that have been commanded to halt.
Boot — Display color for nodes that are booting.
Up — Display color for nodes that are fully operational.
PowerOff — Display color for nodes that have been commanded to power off.
Error — Display color for nodes that encountered an error while booting.
Reboot — Display color for nodes that are rebooting.
No IP assigned — Foreground color for nodes without an IP address.
- Custom color wheel
If you want to change a color assigned to any of the node states, click the color box next to that state; the custom color wheel panel will open. You can select a custom color by moving the circle within the color wheel, by moving the sliders, or by entering values in the fields. This color wheel is based on the RGB (red-green-blue) color model; you can also specify the hue, saturation, and value of the color.

BeoSetup Preferences: Notes
The Notes panel of the Preferences... dialog box lets you specify from 1 to 3 notes that will be visible to users of the cluster.
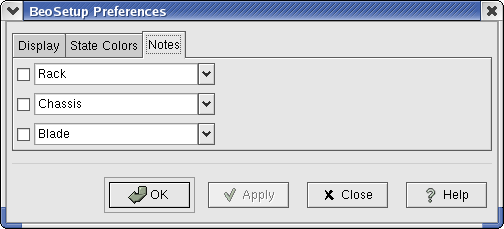
- Notes options
Check any combination of the boxes to indicate which of the notes should be visible to cluster users. Three default values (Rack, Chassis, or Blade) are available through the dropdown menus; you can also enter a note directly in the fields.
Reread Cfg Files
The Reread Cfg Files item in the Settings menu sends a HUP signal to each of the ClusterWare daemons so they re-read the configuration file; this involves the following commands:
[root@cluster ~] # killall -HUP bpmaster [root@cluster ~] # killall -HUP beoserv |
These commands restart the BPmaster and Beoserv daemons, causing them to reread the cluster config file /etc/beowulf/config.
You should never need to perform this operation in response to any of the changes made with BeoSetup. Whenever you apply any of your changes, the appropriate files are automatically rewritten, and the appropriate signals are sent to the appropriate daemons.
One example of when you might use this function is after you've made edits to any of the configuration files using something other than BeoSetup. For your edits to have an effect, more than likely the daemons will need to reread the configuration files.
If you select this menu item when running BeoSetup with limited privileges, you will be presented with a message box informing you that you should be running BeoSetup with full privileges to perform this operation.