Scyld ClusterWare Installation
Scyld ClusterWare is installed using the Penguin Yum repository on MasterLink. Each Scyld ClusterWare release is continuously tested with the latest patches from Red Hat and CentOS. Before installing or updating your master node, be sure to visit MasterLink to determine if any patches should be excluded due to incompatibility with ClusterWare. Such incompatibilities should be rare. Then, update RHEL5 or CentOS 5 on your master node before proceeding (excluding incompatible packages if necessary) with installing or updating your Scyld ClusterWare
Configure Yum To Support ClusterWare
The Yum repo configuration file for Scyld ClusterWare must be downloaded from MasterLink and properly configured:
Login to MasterLink at http://www.penguincomputing.com/support/masterlink
Click on Download your Yum repo file to download this clusterware.repo file and place the it in the /etc/yum.repos.d/ directory.
Set the permissions:
[root@scyld ~]# chmod 644 /etc/yum.repos.d/clusterware.repo
With this setup complete, your master node is ready to retrieve Scyld ClusterWare installations and updates.
Install ClusterWare
You can use Yum to install ClusterWare and all updates up to and including the latest ClusterWare release, assuming you have updated your RHEL5 or CentOS 5 base distribution as prescribed in the ClusterWare Release Notes.
Verify the version you are running with the following:
[root@scyld ~]# cat /etc/redhat-release
This should return a string similar to “Red Hat Enterprise Linux Server release 5.3 (Tikanga)“ or “CentOS release 5.3 (Final)“.
Clear the Yum update list and cached packages with the command:
[root@scyld ~]# yum clean all
Remove base distribution openMPI files that will cause yum groupinstall to fail, using the command:
[root@scyld ~]# yum remove openmpi* mvapich*
Perform the Yum install:
which prompts you to accept the list of rpms before actually updating the system.[root@scyld ~]# yum groupinstall Scyld-ClusterWare
If the Yum install completes successfully, a complete! message is displayed to the terminal.
If Yum fails with a Transaction Check Error that complains that a base distribution rpm is newer than the Scyld ClusterWare rpm that is attempting to replace it, then you must manually install the downlevel Scyld ClusterWare rpm(s). For example, if the complaint is about the kernel rpm, then do:
and locate the newest ClusterWare kernel, which should reside in either cw-core/packages or cw-updates/packages. Then install that newest kernel, e.g.:[root@scyld ~]# cd /var/cache/yum [root@scyld ~]# ls cw-*/packages/kernel-*
and repeat the groupinstall:[root@scyld ~]# rpm -i --oldpackage cw-updates/packages/kernel-*
which should now complete! successfully.[root@scyld ~]# yum groupinstall Scyld-ClusterWare
The latest ClusterWare kernel should now be installed on your system. Edit /etc/grub.conf, if necessary, to make this newest ClusterWare kernel the default for subsequent reboots.
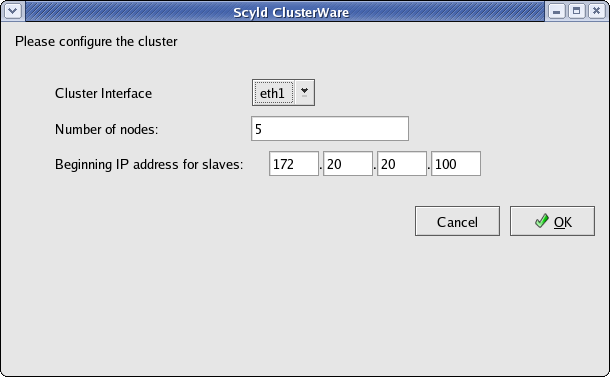
Run the beonetconf graphical utility to configure the private network for the Scyld ClusterWare cluster.
In the Cluster Configuration screen, choose your cluster private interface (typically eth1) from the dropdown, then enter the number of licensed compute nodes you have in your cluster and the beginning IP address for the compute nodes. Then click OK.

The beginning IP address is chosen by the system as station 100, based on the IP address you chose when you manually configured the private interface. For example, if you chose 172.20.20.1 as the address for eth1, the system would use 172.20.20.100 as the beginning IP address for your compute nodes.
For a Class C subnet, which allows only 253 station addresses, the default starting address of 100 will result in a maximum of 153 nodes in your cluster. To configure more than 153 nodes for a Class C subnet, choose a different starting address and/or a subnet mask that allows more station addresses.
This utility modifies the /etc/beowulf/config file. You can also modify /etc/beowulf/config using the beosetup utility or by directly editing the file. The changes will take effect after the system reboots.
Reboot your system.
To verify that ClusterWare was installed successfully, do the following:
The result should match the specific ClusterWare kernel version noted in the Release Notes.[root@scyld ~]# uname -r